Getting Started
Overview
In this document, you will learn how to setup your environment and begin developing scripts for Sylvanas. We will try to cover as much information as possible in this short guide, but if you still have any questions you can contact us and we will gladly help you as soon as possible. If you don't have your loader/user setup yet, check Getting Started - User Guide before continuing with this guide.
Welcome Letter
First of all, thanks for your interest in developing scripts for Sylvanas. Since we are internal, we have our own custom-made Lua API that is nothing like the WoW one, which can make it seem like working with us is more difficult than what you might be used to; this is why we will always appreciate your hard work and dedication, as we are aware that not everybody would be able to tackle such challenges. As a fellow developer, you will earn our respect; active developers will enjoy a series of unique benefits. We still don't know the specifics, but one thing is for sure: you will have a free subscription as long as you are active. As for the other benefits that we are planning, we can't discuss them all with you yet, but more information will be shared as soon as possible. Among these benefits, we are thinking of monetization support for some Lua Scripts.For full details about our developer roles, benefits, and monetization system, please visit the
👉 Developer Program Overview page.
Without further ado, let's begin programming!
Getting Started
You can skip this part if you already have Visual Studio Code installed and the sumneko Lua extension installed and enabled.
First of all, we have to setup our IDE. You can program even with a notepad if you want, but we recommend you to follow this small tutorial, since we provide with intellisense mechanisms that are only available on Visual Studio Code with the sumneko Lua extension. (You can ignore the first 2 steps if you already have Visual Studio Code installed)
- Navigate to Visual Studio Code - Official Page
- Click on the "Download for Windows" button and install the program.
- Open Visual Studio Code
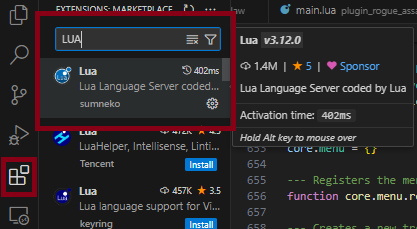
- Navigate to the extensions section (on the left bar, the second icon starting from the botton). Then, search "LUA" and install the first plugin that appears. (Check that the developer is "sumneko", just in case).
Now, our IDE is good to go. The next step is to prepare our scripting development environment.
- Go to the folder where you have placed your loader
- Locate the "Scripts" folder and place yourself inside of it.
- There, you will see many encripted scripts that were donwloaded after you logged into your account using the loader.
- The files that are required for you to develop your scripts are "Common" and the ones starting with "Core". Developer tools and prediction playground are nice to have too. (Although we recommend to not modify the initial Scripts folder)
- Create a folder inside the scripts folder. For example, "script_plugin_test"
- Inside "script_plugin_test", we will create 2 files: header.lua and main.lua
Now, everything is almost ready to actually begin coding.
You can also just download the example plugin below. (Although downloading it from the Github repo is recommended, so you can be sure that you are downloading the latest version.)
Checking the API File (Optional)
The Lua plugin that we previously added to Visual Studio Code no longer requires you to manually download the API files. The _api folder is now automatically updated and managed by us whenever you run the loader. This ensures that you always have the latest version of the API in your script folder without any extra effort.
However, if you’re curious to explore or manually check the API files, you can still access them here:
You can browse the latest _api folder on our open GitHub repository.
Alternatively, you can download the mage fire example, which
already includes a sample setup.
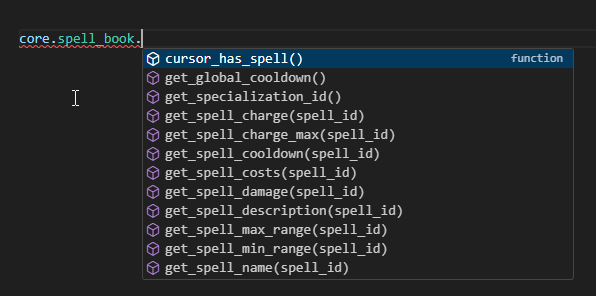
After your setup is successful, you should see Intellisense working:
Now, we should be good to actually start programming :)
Header File
The name of this file MUST be "header.lua". Other names are not accepted and the core won't recognize your script if you attempt to modify its file name.
This is the file that will essentially tell the core if your script will be loaded or not. This makes sense because you might develop a Fire Mage script, for example.
The script shouldn't be loaded under any circumstance if the user is not playing a Fire Mage in this case. This file is also used to uniquely identify your plugin.
You will see how to use it more clearly with an example (the following example is the same code that we use in the Placeholder Plugin):
local plugin = {}

plugin["name"] = "Placeholder Script"
plugin["version"] = "0.0.0"
plugin["author"] = "Placeholder Author"
plugin["load"] = true

-- check if local player exists before loading the script (user is on loading screen / not ingame)
local local_player = core.object_manager.get_local_player()
if not local_player then
    plugin["load"] = false
    return plugin
end

---@type enums
local enums = require("common/enums")
local player_class = local_player:get_class()

-- change this line with the class of your script
local is_valid_class = player_class == enums.class_id.DRUID

if not is_valid_class then
    plugin["load"] = false
    return plugin
end

local player_spec_id = core.spell_book.get_specialization_id()
-- change this line with the spec id of your script
-- the spec id is in the same order as it appears in the talents WoW UI
local is_valid_spec_id = player_spec_id == 1

if not is_valid_spec_id then
    plugin["load"] = false
    return plugin
end

return plugin
As you can see, the core is expecting a table to be returned, with the following members filled:
- "name"
- "version"
- "author"
- "load"
All the elements of the table are self-explanatory. Just note that when the table["load"] is false, the plugin won't be loaded.
Main File
The name of this file MUST be "main.lua". Other names are not accepted and the core won't recognize your script if you attempt to modify its file name.
This is the file where all your logics must be placed, as this is the only file that the core will read, other than the header one. You can obviously have multiple files, just note that you will eventually have to
import the code that you want to be run to the main file.
Since main.lua can become quite lengthy, we’ll start with a brief example here. For more detailed scripts, see the examples below.
-- Note:
-- This is a very basic example.
-- For a more comprehensive example, visit our GitHub or download the Fire Mage example script provided below.

local menu_elements =
{
    main_tree = core.menu.tree_node(),
    keybinds_tree_node = core.menu.tree_node(),

    -- you can add more menu elements in future here
}

-- and now render them:
local function my_menu_render()

    menu_elements.main_tree:render("Simple Example", function()
        -- this is the checkbohx that will appear upon opening the previous tree node
        menu_elements.enable_script_check:render("Enable Script")

        -- you can render more menu elements in future here...
    end)
end

core.log("Hello World! (This should be printed just once on console)")

local function my_on_update()

    local is_plugin_enabled = menu_elements.enable_script_check:get_state()
    if is_plugin_enabled then

        -- When menu element enable_script_check
        -- Is true, this will spam console in white
        core.log("Plugin Test is ENABLED!")
    else

        -- When menu element enable_script_check
        -- Is false, this will spam console in yellow
        core.log_warning("[DISABLED] Test Plugin")
    end
end

core.register_on_update_callback(my_on_update)
core.register_on_render_menu_callback(my_menu_render)
The way Sylvanas uses the main/header files
The way we handle the Lua is simple. We just read the header file and the main file once (on injection / Lua reload). Then, we store all the information that is present in both files and then we internally run the code that we just stored. All the code that are not callbacks, or inside a callback, is just read and executed once.
For more information about callbacks, check the more in-depth explanation of the available callbacks. You should know the way they work and what each one of them does before begining to develop scripts.
Fire Mage Example
Below, we provide you with a placeholder script. This has most of the required basic functionality and checks. This is, by no means, enough to develop a complete script, you should still check the guides for more info and slowly improve yourself.